The built in notification system, first ever in Joomla, allows your app to keep the user (or group of users) informed about various different events. Think of notifications as important alerts that user would be interested to read and keep track of it.
Notifications can be generated everywhere. In your component or plugins and later displayed inside JomSocial notification system.
This tutorial will show you how, but since we do not have idea of any third-party component we could use:) the examples will be done on a community plugin which will be triggered at onAfterProfileUpdate event
If you don"t know how to create plugin which will be triggered on this event, we suggest you to check this guide
As stated in overview of this tutorial, we will generate notifications using community plugin.
You will most likely want to create notifications inside your component, or your plugin. The following tutorial will work in any of this cases. You only need to determine at what point in your code the notification will be created and just load the JomSocial Core Libraries file.
require_once JPATH_ROOT . "/components/com_community/libraries/core.php" ;
Following the tutorial explained bellow will work just fine for your extension too
Preparing the Development Environment1.
We will assume that you"re already created community type example
plugin which will be triggered when user changes its profile
If not, you can download empty example plugin from , install it in Joomla and enable the plugin. It is named Community - Notifications Example
2.
Navigate to your database and empty
these two tables, so they dont have any records at all
A) prefix_community_notification
b) prefix_community_mailq
3. Have at least two (2) users at your test sites and know their ID"s
In earlier versions of Joomla, user ID"s have always started from specified number (62, 42) In Joomla 3, this number will be random, hence, the picture of our testing environment because it will definitely be different at your end.
The First NotificationOpen the plugin php file which will be located in ROOT/plugins/community/example
Within the function onAfterProfileUpdate() replace the
CNotificationLibrary:: add ( $cmd , $actor , $target , $subject , $body , $template , $params ) ;
As shown on the example, notification add api have 7 parameters
Knowing all this, lets define the variables we will use
Change your plugin code to:
$user = CFactory:: getUser () ; $cmd = "system_messaging" ; // first param, type of activity $actor = $user -> id ; //second param - get the id of $actor $target = "965" ; // third param. Who receive notification? In our dev environment, its admin user with id 965. At your environment, you will most likely want to get the ID from your object or from array of users. $subject = "Notification Subject" ; // Subject of both, email and popup notifications $body = ; //Body message in emails. $template = "" ; // If you need to use specific jomsocial template file, you can define it here. $params = new CParameter("" ) ; // We want to create an additional params object, and assign data to it, without having to formally define a class CNotificationLibrary:: add ( $cmd , $actor , $target , $subject , $body , $template , $params ) ;
Now login with any user and change the profile information. Lets go to database to see what happened.
Navigate to prefix_community_notifications
table and observe the new record
Navigate to prefix_community_mailq table, and see the new record
Congratulations! - You have successfully created your first very own notification which has been dispatched via email and internal JomSocial notification system
 Potential Code Bloat
Above example is fine, and it works, but generally it is not recommended to use it like that. Instead, it could be written like this
$actor = CFactory:: getUser () ; $params = new CParameter("" ) ; CNotificationLibrary:: add ( "system_messaging" , $actor -> "This is the notification body message" , "" , $params ) ;
This is much cleaner and easier to follow while basically doing absolutely same thing as a code shown above.
Custom Notification ParametersA notification API can be extended with any param you would like to add.
These params can be passed to either email template, notification, and of course, language file.
$actor = CFactory:: getUser () ; $link = "http://www.google.com" ; $params = new CParameter("" ) ; $params -> set ("actor" , $actor -> getDisplayName () ) ; // can be used as {actor} tag $params -> set ("actor_url" , "index.php?option=com_community&view=profile&userid=" . $actor -> id ) ; // Link for the {actor} tag $params -> set ("url" , $link ) ; //url of the whole activity. Used when hovering over avatar in notification window. Can be used as {url} tag in outgoing emails too. Make sure that you have defined $link variable:) CNotificationLibrary:: add ( "system_messaging" , $actor -> id , "965" , "Notification Subject" , "This is the notification body message" , "" , $params ) ;
- $params = new CParameter(); - We want to create a new params object, and assign data to it, without having to formally define a class.
- $params->set("actor", $actor->getDisplayName()); - Your notification should always have an actor. This param can be passed to template as {actor} tag. In notification window, it defines the user that carries an action.
- $params->set("actor_url", "index.php?option=com_community&view=profile&userid=" . $actor->id); - Actor URL is usually the url of an actor. In notification popup, it adds the link to the {actor) element
- $params->set("url", $link); - This is most important paramater you must always set properly. In notification window, this param is used over the avatar image. In email notification, it echoes the location where activity occurred.
For this example, we will set variable $link to lands on www.google.com so you can see how it works
Adding Language String and Use ParamsHaving the params we just set are available to be used in our language files as well.
Lets define the language keys by altering the "CNotificationLibrary::add()
API
CNotificationLibrary:: add ( "system_messaging" , $actor -> id , "965" , JText:: sprintf ("PLG_COMMUNITY_EXAMPLE_SUBJECT" ) , JText:: sprintf ("PLG_COMMUNITY_EXAMPLE_BODY" ) , "" , $params ) ;
The language file should look like this
PLG_COMMUNITY_EXAMPLE_SUBJECT = "{actor} updated profile" PLG_COMMUNITY_EXAMPLE_BODY = "Hi Admin \n This is the mail to inform you that {actor} updated profile \n\n If you want to go to Google, click here \n a href=" _QQ_"{url}" _QQ_">{url}"
In this example, we have used the tag {actor) and {url} to pass the data to both, notification, and email templates. Lets see how does that look.
In notification window when hovering over avatar, notice the {url}
param kicked in and adds the link to google over avatar. It is intentional , because we made it that way:)
In the same window, when hovering over actor link. This is the part where {actor} echoed the user that carries an action, while {actor_url}" taken care that object is linked properly

Lets see what happens in the email queue
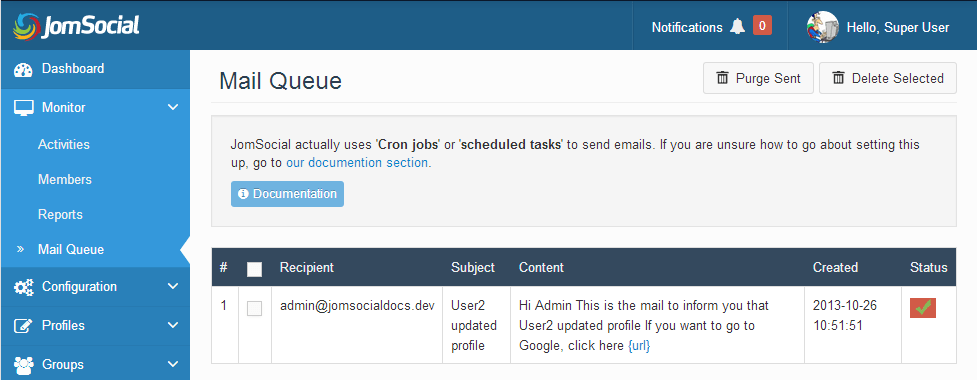
And finally, the actual email that is sent to end user

Success
Till now, we created three (3) parameters that are successfully used in notification window, and emails.
Similarly, you can define "
- {target} - if you need it
- {target_url} if you need it in your notification.
- (title) - Commonly used to refer to an object that generated notification. Example: "User X posted new photo in Album Y ." Album Y is title here
- {title_url} - As with previous ones, the url of an object that generated notification.
- {message} - This param can be used to set (and echo) the message in the body of JomSocial email.
К этому моменту в данном курсе заложена основа нашего плагина, определён пользовательский hook и привязано постоянное сообщение, чтобы показать, как этот hook работает.
То, что мы не сделали, это не реализовали типы сообщений и их отображение согласно введённым пользователем данным.
Но прежде, чем приступать, нам нужно добавить поддержку для различных типов сообщений, интерфейс класса, который будет поддерживать каждый тип сообщения и структуру данных, необходимых для хранения таких сообщений.
Готовы начать?Я с нетерпением жду продолжения урока, но есть несколько вещей, которые нам необходимо рассмотреть перед тем, как с головой окунуться в исходный код. Убедитесь, что в вашей системе установлено следующее программное обеспечение:
- PHP 5.6.25 и MySQL 5.6.28
- Apache или Nginx
- WordPress 4.6.1
- Предпочитаемый вами IDE или редактор
И если вы ищете решение "все-в-одном", не забудьте попробовать MAMP .
Мы продвинулись доКак упоминалось ранее, мы находимся ровно в середине этого курса. Если вы пропустили какой-то из первых уроков, вот то, что мы рассмотрели к настоящему моменту:
И вот что мы рассмотрим на заключительном этапе обучения:
В настоящее время у нас есть иные задачи, на них мы и сосредоточимся.
Вернёмся к работеПоскольку мы обратились к работе (и, как было сказано в предыдущих уроках), мы стремимся к дальнейшей реализации задач в этой части:
В этом уроке мы продолжим развитие нашего Settings Messenger путём добавления поддержки для успешных и ошибочных сообщений, а также затронем вопросы безопасности.В предыдущей статье , мы начали работу в Settings Messenger, но только до настройки функции, которая будет постоянно отображать успешное уведомление во время загрузки пользовательской страницы.
В этом уроке мы добавим поддержку для ошибочных, предупреждающих и успешных сообщениях. Затем выведем их на экран, чтобы получить представление как messenger будет работать.
Кроме того, мы собираемся внести ещё одно изменение, которое добавит поддержку для отклонения уведомлений по усмотрению пользователя.
Это весь план необходимой работы на этот урок. Давайте начнем.
Расширение Settings MessengerПомните, что вся суть Settings Messenger состоит в определении для нас своего способа работы с пользовательскими сообщениями, пользовательскими hooks и родной WordPress API для отображения сообщений в контексте WordPress панели администрации.
Для этого мы собираемся расширить работу, проделанную в прошлом уроке и начнём отсюда.
Успешные сообщенияПоскольку мы начали с успешных сообщений в предыдущем уроке, давайте с ними и продолжим. Теперь у нас есть жестко-кодированный метод, который отображает единственный приём:
"."n"; /* тело XML-документа */ $xarg["xml"] .= "" . $xml_string . ""; /* XSL-шаблон */ $xarg["xsl"] = implode("", file("style.xsl")); /* выводим HTML-код - результат XSL-трансформации */ echo xslt_process($xh, "arg:xml", "arg:xsl", NULL, $xarg); /* выводим XML-исходник (debug) */ echo "" . htmlspecialchars($xml_string) . ""; ?>
Главное новшество - в объекте $global_content, название которого говорит само за себя. В данном случае он принадлежит классу Outputable, в реальных задачах вы, наверное, создадите отдельный класс для контента страницы.
Если внимательно присмотреться, то содержательная часть скрипта практически не изменилась - тот же inbox, тот же toPage(). Добавлена инструкция, которая содержимое списка сообщений выводит в контент страницы. Для разнообразия теперь генерируется два сообщения.
Для того, чтобы посмотреть на результат, осталось только подготовить XSL-шаблон.
style.xsl
XSLT Example
Чего же мы добились?
Прежде всего, можно смелее браться за сложные проекты - обеспечена реальная независимость модулей. Порядок укладки результатов на страницу теперь контролируется с помощью внешнего XSL-шаблона и не зависит от порядка запуска модулей.
Любой модуль, который генерирует XML-данные в качестве результата своей работы, может быть использован в проекте. Кстати, это одно из преимуществ перед template-движками, в которых создание данных заключается в последовательности вызова методов (assign и т.п.) конкретного движка, на которых нет общего стандарта.
Еще одно преимущество - легкость отладки. Если вы запустите скрипт, то заметите, что на каждой странице присутствует debug-вывод - XML-прообраз, который здорово упрощает отладку приложений.
Над чем надо еще подумать - как создавать объекты-сообщения. Не всегда удобно использовать new непосредственно в клиентском коде. Но, пожалуй, это тема для отдельной статьи.
Напоследок, галопом о перспективах:
* всплывающие окна для списка важных сообщений
* "страницы-отправители" и "страницы-адресаты" в сообщениях
* ведение лога сообщений в базе данных
* кнопка "показать историю моих действий"
* статистический анализ действий пользователей в пределах сессий
* "интеллектуальные помощники" в веб-приложениях